The introduction of the Microsoft Graph has expanded the way that developers can consume Office 365 data across the different services. In this example, I will demonstrate the use of integrating the Microsoft Graph so that we can create an employee directory pulling data from our Azure Active Directory.
In part one of this series, we will take a look into setting up our application registration within Azure Active Directory. If you do not have global administrator rights within your organization, you will either need to have someone grant you those privileges or bug another admin until they can do it for you.
The first step in this process is to access your Azure Active Directory administrator panel by going here: https://portal.azure.com and logging in with your O365  credentials. After logging into your Azure instance you will need to select Azure Active Directory. At this point, under ‘Manage’ you will want to select ‘App Registrations.’ After selecting this option, Active Directory will then take you an overview of the applications that have already been registered under Active Directory. As you can see in the example below, there already two test applications registered with this particular Azure Active Directory. Both
 of these applications are labeled “ADALTest” because they are testing the capabilities of the ADAL JavaScript library (ADAL stands for Active Directory Authentication Library, we will get into this in another part). This page allows you register a new application. Select the link that I have highlighted with a red box (‘New application registration’).
We are then taken to a screen to give our new application a name.  For this example, I’m simply going to name this application ‘ADALTest3.’ The ‘Application type’ field should already be selected as ‘Web app/API.’ If it is not, then go ahead and change the drop down selector to that. Finally, the ‘Sign-on URL’ field can be just about anything, unless you have a specific sign-on page for your organization. For example, in the previous applications that I registered in Azure AD, I selected my organization’s root SharePoint site as the sign-on URL. When you are completed with this form, select ‘Create.’
After your application has been created, we need to do some setup to make sure it works properly. We need to add a proper Reply URL, add the Microsoft Graph to this application registration, and also grant permissions so that our application can read our user’s basic profile data. The first step is setting up the Reply URL.
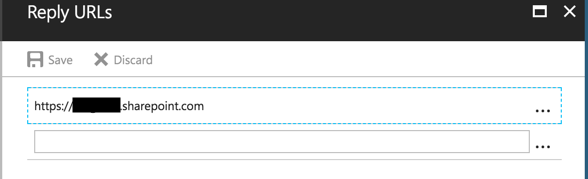
To set this up, select the application you just created and then select ‘Settings.’  This then opens up the menu to select ‘Properties’ and other options. We will want to select ‘Reply URLs.’ It is important to note that your Reply URL must match exactly to where your browser will re-direct the user after they are authenticated. If it does not match exactly, the application will display an error. To
make life easier, you can simply copy and paste the URL into the Reply URLs menu. I have found that pasting a few different case variations of the link will help alleviate issues with the Application not matching the URL.
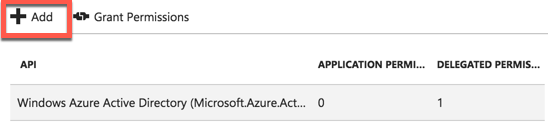
The next step we need to take, is to add the Microsoft Graph to the list of authorized applications. In the same way we added Reply URLs, we will access the permissions. However, in lieu of selecting ‘Reply URLs’ we select ‘Required Permissions.’ After selecting required permissions, you will see a view similar to this. On this view, we want to select ‘Add.’ This will then allow you to select multiple applications to have access to our Azure Application. After selecting ‘Add,’ Azure will then take you to the following screen to select your applications and also permissions.
 The very first (and most obvious) selection is to click on ‘Select an API.’ This will reveal a list of all of the Microsoft Office APIs that can be added to your
  application. For This example, we will click on ‘Select an API’ and then on the following screen we will select the ‘Microsoft Graph’ API to use with our application. As you can see, there are many other APIs that you can connect to and consume the data from. Microsoft has gone through great lengths to make Office 365 the most consumable suite of applications available.
After we select our API, we need to select the proper permissions so that our application will actually return data for our web application to consume. For this application, it will be very simple. We want to allow our application to ‘Sign in and read User profile’ as well as be able to ‘read all users’ basic profiles.’ Both of these permissions are delegated permissions and do not require another global administrator to approve them.  There are many other options available that give the Microsoft some very powerful features. However, those are out of scope for this particular project, all we need to do is read all of the other users’ basic profile data.
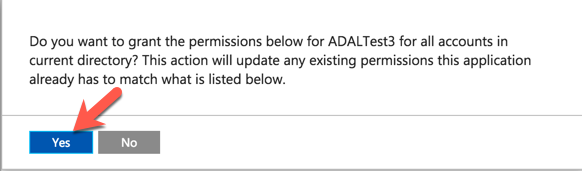
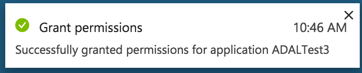
The next step is to grant permissions to the APIs so that each user does not have to individually  grant permission (which is a nice feature of permission delegation). To achieve this, we simply select the ‘Grant Permissions’ button on the same page where we added the permissions. After this is selected, you will get a confirmation prompt requiring you to verify permissions. Select ‘Yes’ and you will then see a prompt letting you know that this was successful.
 Finally, we now need to alter the Manifest. The manifest is an XML document that allows you to alter multiple settings within the application itself. For our example, we need to alter to two settings: ‘oauth2AllowImplicitFlow’ and also the ‘oauth2AllowUrlPathMatching.’ We want to change these settings from ‘false’ to ‘true’
By adjusting these two features we are allowing the application to obtain access  tokens (however, it does not support the issuance of refresh tokens). According to Sahil Milk (from this blog) “the implicit grant type does not include client authentication, and relies on the presence of the resource owner and the registration of the redirection URI. In the case of Azure AD, you are redirected to the AzureAD sign on process to perform this authentication.” This type of authentication is perfect for single page applications, but not for app only services.
 Make sure that you save all of your changes. The last thing you want to do is make all of your changes forget to save! In the next session, we will set up our environment using ADAL (Active Directory Authentication Library) library. This allows us to authenticate our application.
